Migrate WooCommerce Products to Shopify from a CSV Export
Migrate products from WooCommerce to Shopify by uploading its built-in CSV export: variations become variants, attributes become options, categories become tags.
Free plan available · No credit card required · Shopify connection optional
The problem: a WooCommerce export is not a Shopify CSV
WooCommerce can export your whole catalog to a CSV in one click, and Shopify can import products from a CSV. The two files have almost nothing in common. Shopify does not recognise a single WooCommerce column, and the way the two platforms lay out a product with variants is different at the row level, not just in the headers.
The columns that cause the most work by hand:
| WooCommerce column | Example value | Why it is a problem for Shopify |
|---|---|---|
Type + Parent | variable / variation, id:1042 | Shopify groups variants by a shared Handle, not by a parent ID |
Attribute 1 name / Attribute 1 value(s) | Size / Small, Medium, Large | The parent lists every value; Shopify wants one Option1 Value per variant row |
Categories | Home > Audio, Sale | Shopify has no field for your own category tree; its Product Category takes an entry from Shopify’s standard taxonomy, so your tree has to land in Type and Tags |
Regular price / Sale price | 49.00 / 39.00 | Shopify charges Variant Price and shows Variant Compare At Price struck through, so the sale price becomes the price and the regular price the compare-at, but only while the sale’s dates are active |
Published | 1, 0, -1 | Shopify uses Status (active / draft) plus a true/false Published |
Images | https://…/a.jpg, https://…/b.jpg | One comma-separated cell; Shopify wants one image per row with an Image Position |
Weight (lbs) | 2.5 | Shopify’s CSV takes whole grams in Variant Grams; the unit lives in the header |
Description | <!-- wp:paragraph --><p>… | WordPress block markers and shortcodes end up as literal text in the Shopify description |
The row structure is the part spreadsheets are worst at. WooCommerce writes one row for the variable product and one row per variation underneath it, linked by an ID. Shopify has no product row of its own: the product’s title, description and images sit on the first variant’s row, and every further variant repeats the handle with its option name and value spelled out. Four WooCommerce rows become three Shopify rows:
| Type | Name | Parent | Attr 1 name | Attr 1 value(s) |
|---|---|---|---|---|
| variable | Basic Tee | — | Size | S, M, L |
| variation | Basic Tee - S | id:1042 | Size | S |
| variation | Basic Tee - M | id:1042 | Size | M |
| variation | Basic Tee - L | id:1042 | Size | L |
| Type | Handle | Title | Option1 Name | Option1 Value |
|---|---|---|---|---|
| product | basic-tee | Basic Tee | Size | S |
| variant | basic-tee | — | Size | M |
| variant | basic-tee | — | Size | L |
The variable row does not become a row of its own. Its title, description and images move onto the first variant, which Portaim’s preview labels product. Any price, SKU or stock typed on the variable row is ignored: customers only ever buy a variation, so those values belong to the variations.
Doing that by hand for a real catalog means:
- deleting the variable rows’ own price and SKU, which Shopify would otherwise read as a variant;
- looking up every variation’s parent by ID and copying the parent’s name, description, categories and images onto it;
- picking the one attribute value that belongs to each variation out of the parent’s full list;
- splitting the comma-separated image cell into one row per image, in order;
- converting pounds or kilograms to whole grams;
- working out which sale prices are still running and which expired months ago;
- stripping
<!-- wp:… -->markers out of every description.
Portaim does this conversion for you, deterministically, the moment the file is uploaded.
How Portaim helps
1. Export your products from WooCommerce
In WordPress admin, open Products → All Products and click Export. Leave every column selected and every product type ticked; you can filter later, but the converter needs the standard columns to recognise the file. Download the CSV.
Portaim reads the layout that WooCommerce’s built-in exporter produces, with English column headers. A CSV from a third-party export plugin is not recognised as a WooCommerce file; it still uploads fine, it just goes through the ordinary column-mapping flow instead of the automatic conversion. A WordPress XML export is not a spreadsheet and cannot be uploaded at all.
2. Upload the export to Portaim
Upload the CSV, or paste a link to it if it lives in Google Drive or Dropbox. While the file is being read, Portaim checks the column signature — Type, SKU, Name, Published, Regular price plus a couple of WooCommerce-only columns such as Visibility in catalog or Attribute 1 name — and, on a match, converts the rows to Shopify’s product CSV shape on the spot. The converted rows become the working data for every later step; the file you uploaded is never modified.
Your monthly row allowance is charged on the rows in the uploaded file, not on the converted rows. A 1,800-row export that turns into 4,500 Shopify rows counts as 1,800.
3. Review the conversion card
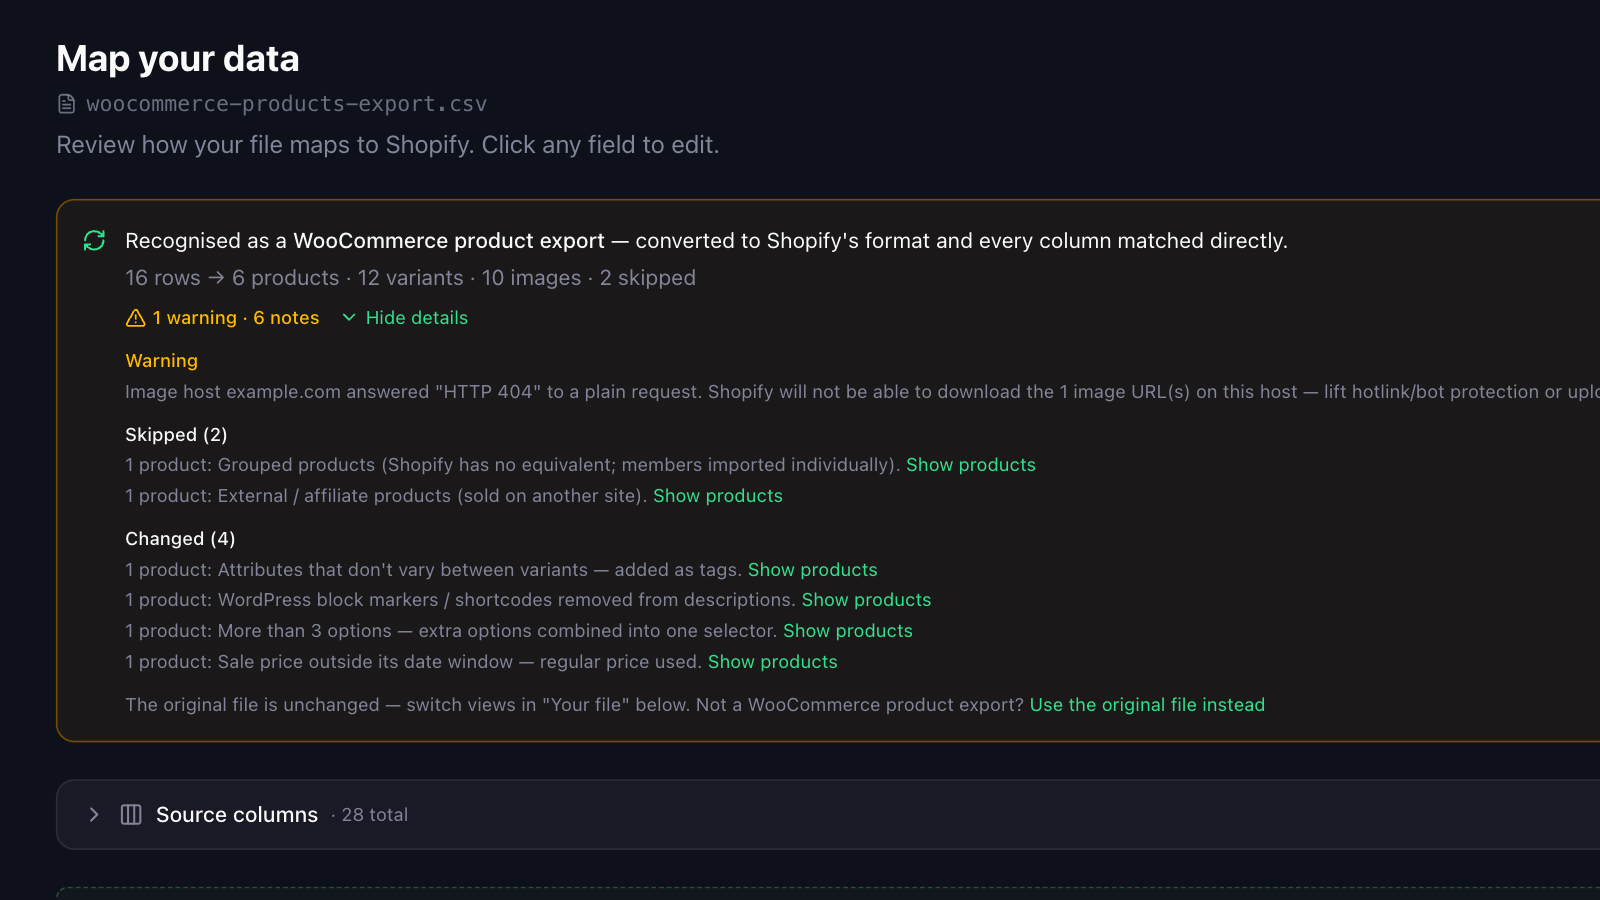
Because the converted columns are Shopify’s own, the mapping step has nothing to guess: every column is matched one-to-one. What the mapping page shows instead is a conversion card — the recognised format, how many source rows became how many products, variants and images, how many products were skipped, and a details panel that groups every notice by what it means for you:
- Warning — an image host that refuses non-browser requests (more on that below);
- Skipped — grouped and external products, variable products with no variations in the file, variations whose parent could not be found;
- Changed — options merged or renamed, attributes turned into tags, sales ignored, descriptions cleaned, galleries truncated, downloadable files not carried over;
- Left for the fix step — duplicate variant combinations in your data, resolved on the next step like any other issue.
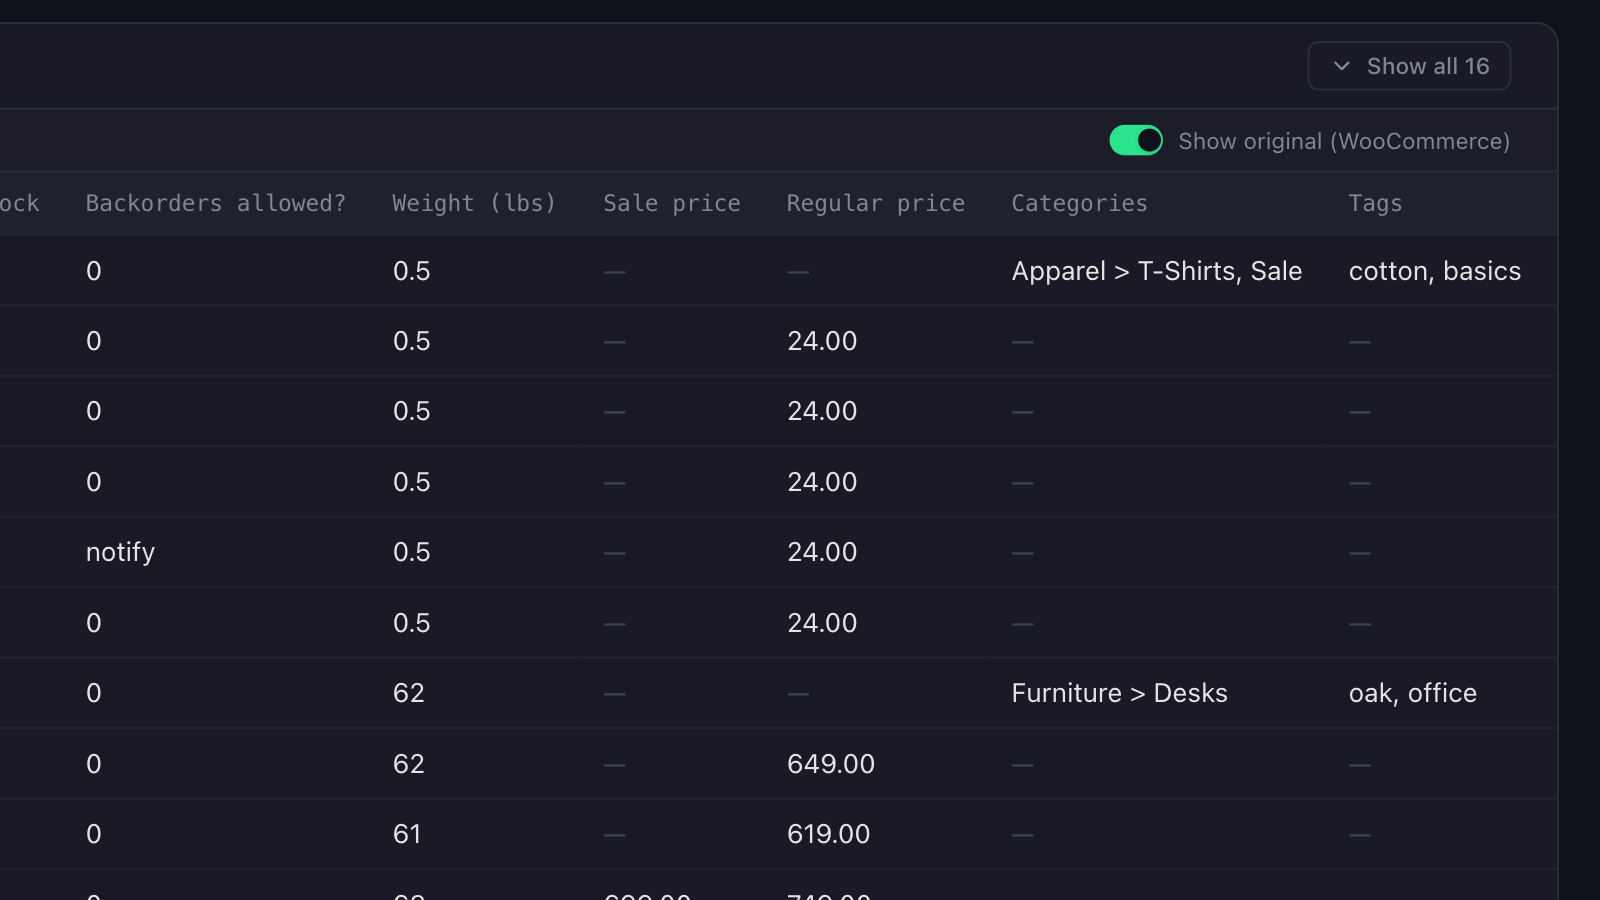
Each group lists the affected products. The file preview shows the converted rows by default with a Show original (WooCommerce) switch to see what you uploaded. If you would rather map the raw WooCommerce columns yourself, Use the original file instead discards the conversion and everything derived from it; the mapping page then offers to convert again if you change your mind.
4. Resolve what the converter left for you
The conversion is deliberately literal about your data: prices are passed through as written, option values are not normalised, duplicate variants are kept. Those are yours to decide on, so they surface in the fix step with the same 40+ Shopify rules every supplier file gets — two variations with the same size and colour, a price with a currency symbol in it, an image URL that is not a URL. Auto-fix handles the formatting problems in one click; the rest show a suggested fix per row.
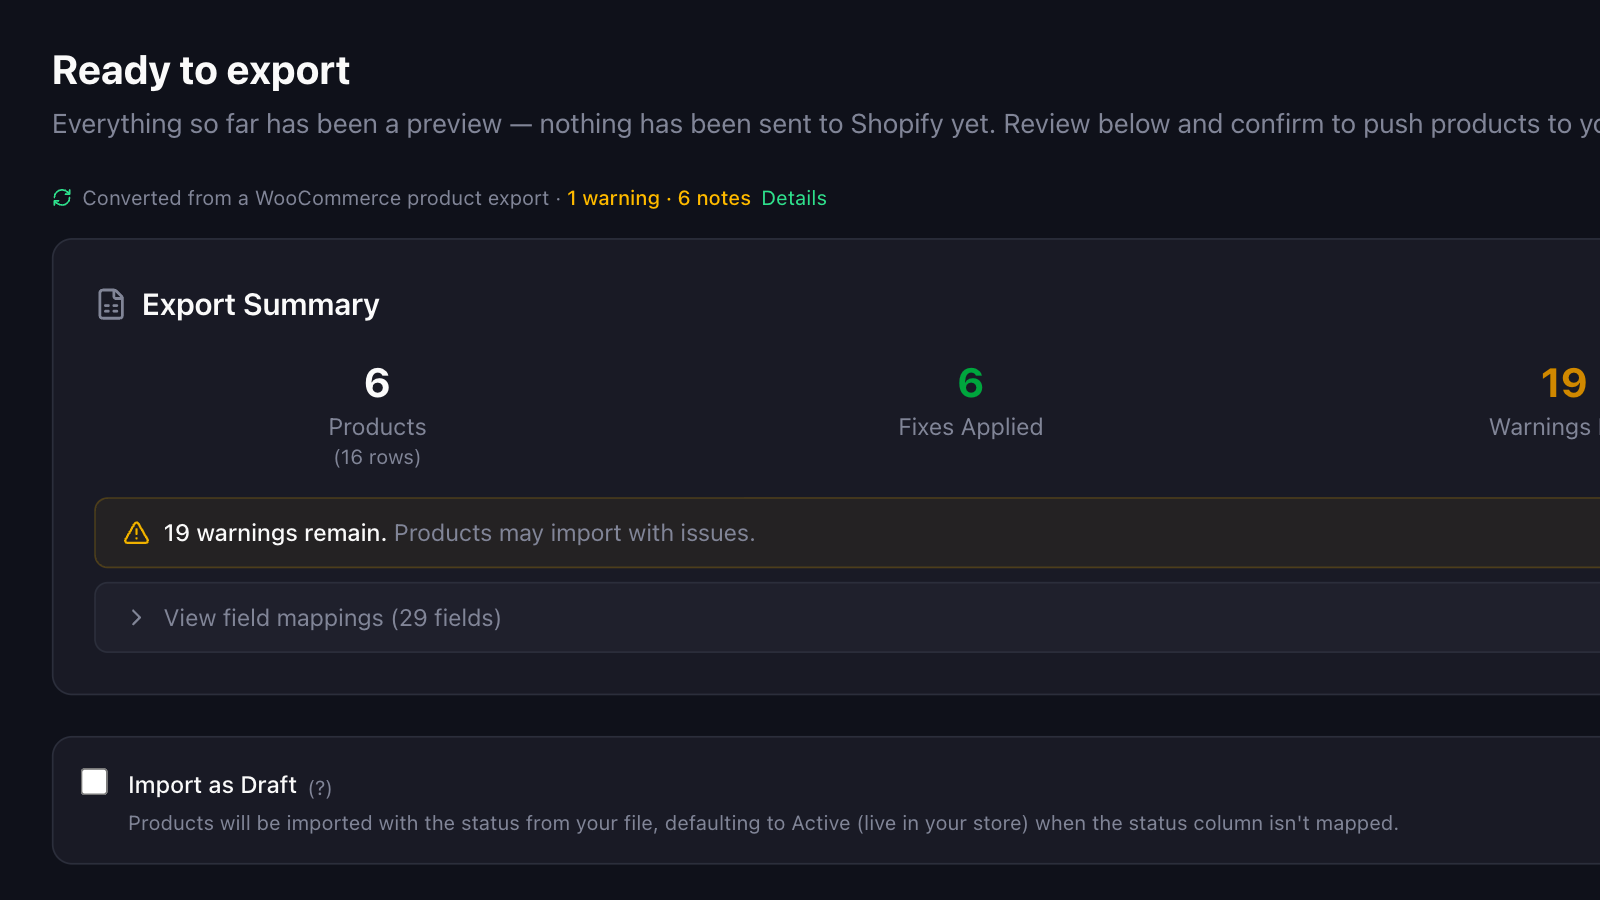
A compact line on the fix and export pages — Converted from a WooCommerce product export · N warnings · M notes — links back to the card, so the image-host warning is still in front of you at the moment before export.
5. Export to Shopify or download the CSV
Push the products straight to your connected store, or download a Shopify-ready CSV and import it in Shopify admin. Both paths carry the same variants, images, tags, stock and weights. Details in the export section.
What the conversion does, column by column
The conversion is deterministic: the same file always produces the same result. This is the mapping it applies.
| WooCommerce | Shopify | Rule |
|---|---|---|
Name | Title, Handle | The handle is the slugified name (Café & Co. 2024 → cafe-co-2024); a Slug column, if present, wins. Two products with the same name get -2, -3; they are never merged. |
Short description + Description | Body (HTML) | Short description first, then the description. WordPress block markers and shortcodes are removed; the HTML itself is kept as is. |
Brands | Vendor | First brand in the list. Empty when your WooCommerce version has no Brands column. |
Categories, Tags | Type, Tags | Last segment of the first category becomes the type; every segment of every category becomes a tag, followed by the WooCommerce tags. Duplicates removed. |
Published, Visibility in catalog | Status, Published | 1 → active and published; 0, -1 and pending → draft. A hidden catalog visibility unpublishes the product without changing its status. |
Images | Image Src, Image Position, Variant Image | The product’s list becomes the gallery, one row per image in order, duplicates removed. A variation’s first image becomes its variant image. |
SKU | Variant SKU | As written. A variable product’s own SKU is dropped; only variations and simple products carry one. |
Regular price, Sale price + dates | Variant Price, Variant Compare At Price | An active sale becomes the price with the regular price as compare-at. No sale, or a sale outside its dates: regular price only. |
Stock, In stock?, Backorders allowed? | Variant Inventory Qty, Variant Inventory Tracker, Variant Inventory Policy | A numeric stock is tracked by Shopify with that quantity. A blank stock stays untracked and sellable; it is never turned into zero. Backorders allowed → policy continue, otherwise deny. |
Weight (lbs) / (kg) / (oz) / (g) | Variant Grams, Variant Weight Unit | The unit is read from the header and the value converted to whole grams; the unit is kept for display. Length, width and height are not carried over. |
Tax status | Variant Taxable | taxable → true; none or shipping → false. Tax classes are not carried over. |
Type flag virtual | Variant Requires Shipping | Virtual products and variations do not require shipping; everything else does. |
Variants and options
A variation is linked to its parent through the Parent column, by ID or by SKU. Older exports that omit the column still work: WooCommerce always writes variations directly after their parent, so the preceding variable row is used and the card notes it. A variation whose parent cannot be found is skipped and listed by row number, never silently attached to the wrong product.
The option axes come from the attribute names your variations actually use, matched by name rather than by column position, and a few WooCommerce habits are translated on the way:
- An attribute with one value across all variations is not an option in Shopify’s sense. It becomes a tag such as
Material: Cotton, as do attributes listed on the parent only and attributes on simple products; - a variation that says “Any Size” (no value for an axis) gets the parent’s default for that attribute, or the first value listed, and the card counts how many were filled in this way;
- more than three attributes — Shopify allows three options per product, so axes three onwards are combined into
Option3asMaterial, Finish, Length=Oak, Matte, 120 cm. Every variant stays distinct and purchasable; - an attribute name containing “ / ” (space, slash, space) is rewritten with a comma. Shopify’s importer uses that sequence as its own variant-title separator and rejects the whole product when an option name contains it;
- two variations with the same combination of values are both kept and flagged, because Shopify will reject the duplicate and only you know which one is right.
If the same attribute is spelled Colour on one product and Color on another, both spellings are kept as written. Supplier files with the opposite problem, where every attribute is crammed into one column, are covered in the split variant columns guide.
Categories and tags
Shopify has no field for a category tree of your own. Its Product Category is an entry from Shopify’s standard product taxonomy, a fixed list Shopify uses for tax and search, and a WooCommerce path like Home > Audio is not one of its entries. So the conversion keeps the whole path in the two fields that take free text:
Your WooCommerce tags and any attributes demoted to tags are appended after the category tags. Once the products are in Shopify, an automated collection with the condition tag equals Audio rebuilds the category page in a minute; nothing about the hierarchy is lost, it just lives in tags rather than a tree.
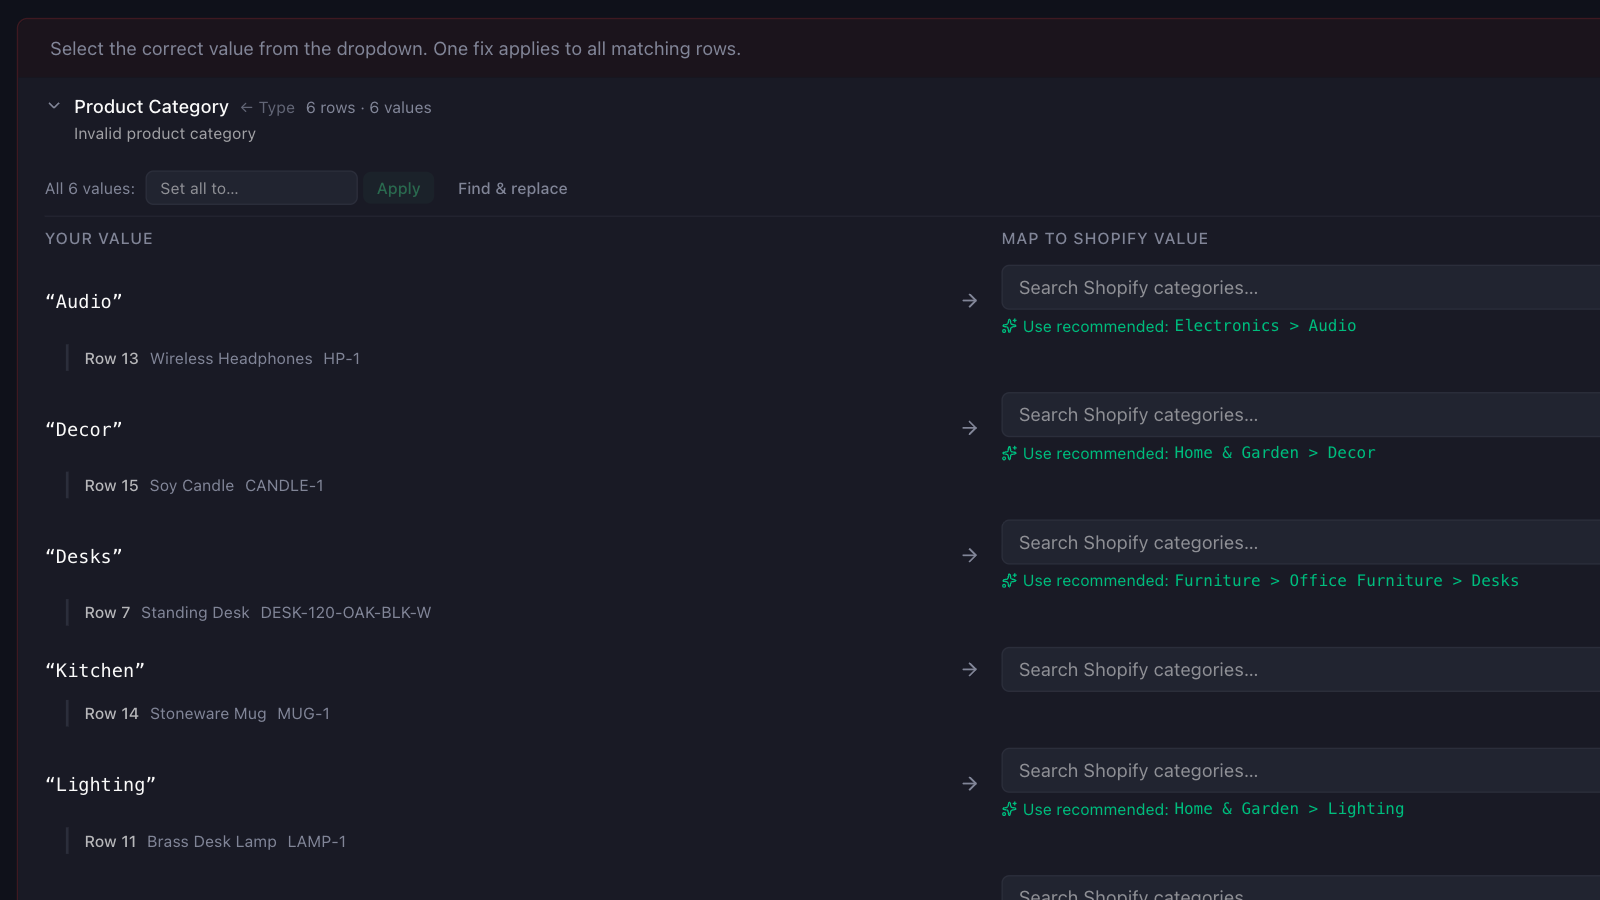
The conversion leaves Product Category empty. If you want it filled, map the converted Type column to it as well in the mapping editor; the fix step then matches each value to the nearest entry in Shopify’s taxonomy, with a per-value review so Audio lands as Electronics > Audio rather than as an unknown value. The supplier categories to Shopify taxonomy guide explains how that matching works.
Prices and sales
Shopify’s CSV has no scheduled sales. The conversion looks at the sale dates on the day you upload and picks the pair Shopify would show that day:
A sale whose window has passed, or has not started, is ignored: the regular price is used and the card lists the product under Changed with the number of variants affected. Price strings are otherwise passed through as written, so a currency symbol or a comma decimal in your WooCommerce data is caught by the fix step, not by the converter.
Images stay on your WordPress site until Shopify fetches them
The conversion passes image URLs through unchanged. Shopify downloads each one from your WordPress site when it imports the product, which means the site has to stay online until the import is done, and it has to serve the files to a request that does not come from a browser. Many hosts and security plugins answer such requests with an HTTP 403. When that happens Shopify’s import still reports success, and every image is quietly missing.
Portaim sends one plain request to each image host during conversion. A host that refuses or does not answer produces the one Warning the card can show, and it stays visible through the fix and export steps. The fix is on the WordPress side: lift the protection for the duration of the import, or export the media and upload it to Shopify Files first.
What does not carry over
Some of this is Shopify’s CSV having no place for the data, some of it is WooCommerce’s export not containing it. Either way you should know before you start:
- Product URLs. The export carries no slug, so handles are built from the name. Set up URL redirects in Shopify from the old addresses once the products are live;
- SEO titles and descriptions. WooCommerce’s export has no columns for them; SEO-plugin
Meta:columns are deliberately ignored; - Collections. Categories become tags and a type, not Shopify collections. Build automated collections from the tags afterwards;
- Grouped and external products. Both are skipped and listed on the card. The members of a grouped product are ordinary rows and import on their own;
- Downloadable files. The product is imported, the download URLs are not. Re-attach the files in Shopify or a digital-downloads app;
- Scheduled sales, tax classes, shipping classes, dimensions, cross-sells, upsells, purchase notes and review settings, none of which have a Shopify CSV column;
- Orders, customers, reviews, pages and posts. Portaim moves products. Shopify’s WooCommerce migration guide covers the rest of the store.
Export to Shopify or download a Shopify-ready CSV
After the fix step you choose how the products reach your store:
- Direct Shopify export — connect your store and Portaim creates the products through the Shopify API, variants, images, stock and weights included. Switch on Import as Draft to have every product land unpublished so you can review them in Shopify admin before they go live.
- CSV download — download a CSV with Shopify’s own headers and import it in Shopify admin yourself. Import as Draft applies here too.
Connecting your Shopify store is optional. For a migration the CSV route has one practical advantage: you can run Shopify’s import against a development store first, click through the products, and only then import into the live store.
When this fits
Portaim is a good fit if you:
- are moving a WooCommerce store to Shopify and the product catalog is the part you dread;
- have variable products with several attributes and want the variants to arrive as variants;
- want to see what changed before anything reaches Shopify;
- would rather fix duplicate variants and odd prices in a review step than discover them in Shopify’s import errors;
- keep the WooCommerce store running during the switch and may need to re-import an updated export;
- export with a third-party plugin or have non-English column headers — the automatic conversion does not kick in, but the file goes through the same column mapping as any other supplier spreadsheet.
Portaim may not be the right fit if:
- you need orders, customers, reviews or content migrated in the same tool;
- your catalog is a handful of simple products; re-creating them in Shopify admin is faster;
- you want an agency to run the whole migration rather than a self-service tool.
Why not import the WooCommerce CSV into Shopify directly?
Shopify’s importer only reads its own column layout. A WooCommerce export uploaded as is is rejected at the header row, because the columns Shopify requires, starting with Handle and Title, are not there. The manual alternative is the seven-item list at the top of this page, repeated for every product, with the variant rows being the part that goes wrong most often.
Portaim sits between the two:
WooCommerce export → Portaim conversion + validation + fixes → Shopify-ready export
The conversion is the mechanical part and it is done for you. The judgement calls, which duplicate variant to keep, whether a price is right, whether an image host will answer, stay with you, and they are put in front of you before export rather than after.
For the mapping-and-validation flow that every other kind of file goes through, see the supplier CSV to Shopify guide or the Portaim docs.
Frequently asked questions
Do my WooCommerce variations survive the move to Shopify?
Yes. Each variation row becomes a Shopify variant of its parent product, with the attribute names as option names and the variation's attribute values as option values. Shopify allows three options per product; if a product uses more attributes than that, the extra ones are combined into the third option so every variant stays distinct and purchasable.
Do the product images move over?
The image URLs do. Shopify downloads each image from your WordPress site when it imports the product, so the site must stay online until the import finishes. If your host blocks requests that do not come from a browser (hotlink or bot protection), Shopify's import reports success but every image fails silently — Portaim checks each image host during conversion and warns you before export.
What happens to my WooCommerce categories?
The last segment of the product's first category becomes the Shopify product type, and every segment of every category becomes a tag, so "Home > Audio, Sale" arrives as type "Audio" and tags "Home, Audio, Sale". Shopify's own Product Category field is an entry from its standard taxonomy, not your category names; the conversion leaves it empty, and you can fill it by mapping the Type column to it and letting the fix step match each value to the taxonomy. Collections can be built from the tags afterwards.
Will my product URLs stay the same?
Not automatically. The WooCommerce export does not contain the product slug, so Portaim builds each Shopify handle from the product name. If your export includes a Slug column, that value is used instead. Either way, set up URL redirects in Shopify for the old WooCommerce addresses once the products are live.
How are sale prices handled?
A sale price that is active on the day of the conversion becomes the Shopify price, with the regular price as the compare-at price. A sale outside its date window is ignored and the regular price is used — Shopify's CSV cannot carry a scheduled sale, and the conversion card lists the products affected.
Do I need a plugin or a special export format?
No. Portaim reads the CSV that WooCommerce's built-in exporter produces (Products → Export), with whatever columns you chose to include. A CSV from a third-party exporter, or one with non-English column headers, is not recognised as a WooCommerce file and goes through Portaim's ordinary column mapping instead. WordPress XML exports are not spreadsheets and cannot be uploaded.
Does this migrate orders, customers or reviews too?
No. Portaim moves product data only: products, variants, prices, stock, weights, images, tags and descriptions. Orders, customers, reviews, pages and blog posts are outside its scope; Shopify's migration guide covers those separately.
Related use cases
Import Supplier CSVs into Shopify Without Manual Cleanup
Import supplier CSV, XLSX, and XLS files into Shopify without spreadsheet cleanup — AI column mapping, 40+ validation rules, auto-fix for common issues, and export as a Shopify-ready CSV or direct API push.
Split Combined Variant Columns into Shopify Options
Supplier files often cram variants into one column like "Red / Large". Here's how Portaim splits it into real Shopify Option1 / Option2 values.
Move your WooCommerce catalog without rebuilding it
Upload the CSV WooCommerce already gives you. Portaim converts it to Shopify's shape, shows you exactly what changed, and exports products with variants, images and tags intact.